This lab introduces you to the basic information about Linux System, compiling using the GNU g++ compiler, and to editing with the very powerful emacs editor.
You must have an account to log on to the system. If you do not have an account on the Math/CS computer system, please ask your instructor to give you one. This is a different system than is used throughout SU; having an SU account is not enough.
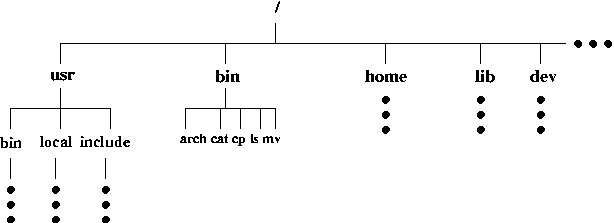
Unlike a simple standalone personal computer, the Math/CS filesystem has components that may exist on many different machines, but the operating system makes it look like the filesystem exists on the computer you are using. The filesystem on a Linux system is conceptually hierarchical (has a tree structure). The "root" of the tree is shown at the top of the figure below and is designated by the slash character ('/'). Every item in the filesystem is either a file or a directory (known as a "folder" in Windows-talk). The concept is essentially the same as in DOS or Windows: a directory can contain other directories and files. A file can contain data, but cannot contain other files or directories.
At any time while using the system, you can think of yourself as being "located" somewhere in the filesystem. Your current location in the filesystem is called your current working directory or cwd.
To decribe a specific location in the filesystem heirarchy, you must specify a "path." The path to a location can be defined as an absolute path from the root anchor point, or as a relative path, starting from your cwd. When specifying a path, you simply trace a route through the filesystem tree, listing the sequence of directories you pass through as you go from one point to another. Each directory listed in the sequence is separated by a slash (a forward slash /, not a DOS-type backslash \). Linux also provides the shorthand notation of "." to refer to the current location, and ".." to refer to the parent directory.
For example, the absolute path to the bin directory that is in the usr directory would be /usr/bin; we start at the root (/), walk to the usr directory, then walk to the bin directory. Notice that there is another directory named "bin". The absolute path to this one is /bin, so it's not the same as /usr/bin.
TASK 1:
Relative paths use the same notation, but they do not start at the root of the tree. For example, if your cwd is /usr/bin, the relative path to the /usr/include directory would be ../include. The ".." takes you one step up the tree, putting you in the /usr directory. From there you go down the tree to the /usr/include directory.
TASK 2:
Remember what the meanings of r, w, and x are for directories and for files:
| Permission | Effect on files | Effect on directories |
| Read (r) | May view file contents. | May list directory contents. |
| Write (w) | May modify file contents. | May modify directory contents (e.g., delete a file). |
| Execute (x) | May run the file, if it's an executable program or script. | May cd into the directory. |
To see information on a file, including permissions, use the ls command, with the -l option.
For example, execute the command ls -l /bin/pwd to view file information for the executable file pwd (that prints the name of your current working directory). The output should look similar to this (there may be small differences):
-rwxr-xr-x 1 root root 13848 Jan 26 2014 /bin/pwd*
The first 10 characters describe the access permissions. The first dash indicates the type of file (d for directory, s for special file, dash for a regular file). the next three characters (rwx) describe the permissions of the owner of the file (namely the "root" user). The root user has read, write, and execute permission. The next three characters (r-x) describe the permissions for those in the group associated with the file (in this case, the group name is also "root"): read, no write, execute. The next three characters (r-x) describe the permissions for all others: read, no write, execute.
TASK 3:
Linux allows you to set the permissions on files that you own. The command to change the file permission mode is chmod (some people pronounce it "shh-mod"). Chmod requires you to specify the new permissions you want, and specify the file or directory you want the changes applied to.
The easy way to set file permissions, is by use of the "rwx" notation to specify the type of permissions, and the "ugo" (u = user, the owner; g = group; o = others) notation to specify those the permissions apply to.
To define the kind of change you want to make to the permissions, use the plus sign (+) to add a permission, the minus sign (-) to remove a permission, and the equal sign (=) to set a permission directly.
For example, to give members of the group permission to write (modify) a file named foo, you would invoke the command chmod g+w foo
TASK 4:
Linux provides on-line documentation for just about every system command or function. There are basically three ways to access the documentation (not counting documentation available on the web): man (manual) pages, the info system, and apropos.
Manual pages are displayed by the man command. Man pages give in-depth information on commands and functions. The system is divided into sections. The sections are not necessarily the same on every system, but typically they are as follows:
| Section | Contents |
| 1 | User Commands |
| 2 | System Calls |
| 3 | Library Calls |
| 4 | Special Files |
| 5 | File Formats and Conversions |
| 6 | Games |
| 7 | Macro Packages and Conventions |
| 8 | System Management Commands |
| 9 | Kernel Routines |
For example, to view the manual page for the system call lseek, you would invoke man 2 lseek Actually, the "2" is optional in this case since there is only one lseek. The section number is only needed when there are multiple entities with the same name, such as time which is the name of both a user command and a system call.
TASK 5:
 LS(1) User Commands LS(1)

NAME ls - list directory contents

SYNOPSIS ls [OPTION]... [FILE]...

DESCRIPTION List information about the FILEs (the current directory by
       default).  Sort entries alphabetically if none of -cftuSUX nor
       --sort.
Every man page has this structure. The first line gives the command and the section. The name of the command is given along with a short description. The synopsis is often the most important information. It shows the forms the command might take with options and arguments. Options or arguments in square brackets, [], are optional. The description section gives a more detailed description of the command. In this example, all options and files are optional, so the command ls is enough to list the contents of the current directory.
The info system gives much the same information as man, but in a different, more searchable format.
The apropos command reports on any uses of the given word in the man pages. It can be useful for finding man pages when you don't remember the exact name of a command. For example, the command apropos pwd lists all the man pages that have the word pwd in them. Try it out. Sometimes you get more than you want. For example, try apropos time.
Use the emacs editor
The emacs editor is perhaps the most powerful editor available for programmers. It's worth learning to use it since it can speed up your programming and help reduce programming errors. Emacs has a tremendous number of features, but you only need to learn a few to use it successfully. As you gain experience, you can learn more features.
Here's the code to type: // hello.cpp
// Demo for Cosc-220 lab
// {your name]
// Created: [ate and time]
// Current: [todayand time]
#include <iostream>
int main()
{
std::cout << "Hello from lab 1" << std::endl;
return 0;
}
g++ -c hello.cppIf successful, you will now have an object file named hello.o in your /Lab1 folder. Type ls to make sure it's there.
g++ -o hello hello.oThe idea is that the name that follows the "-o" is the name given to the executable.
TASK 7: Create a program with multiple source files
Many of your programs in this course will entail several source files. Of course, only one file can contain a main function; the other files contain supporting code. Only trivial programs are written in a single file. Every industrial-strength software development is done using multiple files. Now's the time to learn how.
As an example, if the source code is in several files, say "file1.cpp"
and "file2.cpp", along with a header file named "file2.h", they
are compiled into an executable program named "myprog" using the
following commands: g++ -c file1.cpp
g++ -c file2.cpp
g++ file1.o file2.o -o myprog
The first two commands are called "compile" steps and produce object
files, file1.o and file2.o, respectively. The third command is
called the "link" or "build" step. It produces the executable by "linking" the
object files together. Note that the "-o" is at the end of the command
this time. No big deal, as long as the name that immediately follows it is the
name you want for the executable.
The header file, file2.h, is not mentioned in the compilation because it is #included'd in one or more of the .cpp files. Use the emacs editor to create C++ source and header files file1.cpp, file2.cpp, and file2.h as follows:
  // file1.cpp
  // Contains the main function
  // Demo file for Cosc-220 Lab 1
  //
  // [your own name]
  // Created: [date and time]
  // Current: [date and time]

  #include <iostream>
  #include "file2.h"

  int main()
  {
    using namespace std;
    int i = 3;
    int sq;

    sq = SquareIt(i);
    cout << "Square of " << i << " is " << sq << endl;
    return 0;
  }
  // file2.h
  // Declaration of SquareIt function
  // Demo for Lab 1, Cosc-220
  //
  // [your own name]
  // Created: [date and time]
  // Current: [date and time]

  #ifndef FILE2_H
  #define FILE2_H

  int SquareIt(int);

  #endif
  // file2.cpp
  // Definition of SquareIt function
  // Demo for Lab 1, Cosc-220
  //
  // [your own name]
  // Created: [date and time]
  // Current: [date and time]

  #include "file2.h"

  int SquareIt(int x)
  {
     return x * x;
  }
Last updated 08/28/2014